

Tuesday, August 31, 2010
New Blogger!
I was reading Libby's blog today and discovered that one of the BIG NAMES in the world of primitive quilting, has started a blog of her own! HAPPY DAY! Cheri Payne has her own distinctive style that really appeals to me and I have made several of her projects from the many books and pamphlets that I own. She's only been blogging a few days, but I look forward to getting to know her better through her posts. And I sure hope she shares pictures of her home so we can see how she displays her wonderful creations! She is sharing a block-by-block project called soot&ashes so we can sew along with her if we want to. Boy, do I want to! This afternoon I whipped up all three blocks that she's done so far - I'm using reds instead of the blues that she chose - since I have no idea what the finished quilt will look like, I sure hope it will work! It's kinda like a mystery quilt, huh? The blocks are only 5" so they work up fast! I hope nothing gets me distracted from checking her blog every day for new instructions! Here's what I have worked up so far.......


Saturday, August 28, 2010
Yay! It's Finished!
Well, the hooking part is finished - I still need to whip the edges. But I thought I'd share it with you anyway! I love the way this turned out!

Kinda hard to get a good picture of it because it's so long and skinny, so here are a couple of close ups so you can see details.


This is the first time I've used an 8-1/2 cut and I really enjoyed working with that size, but it seems SO much wider than an 8 cut! Now, I thought that the numbers used to describe the widths of the cuts were 1/32" increments, so a #8 cut was actually 8/32nds" or a 1/4", right? Well, I'm sure that an 8-1/2 cut is more than a 64th of an inch winder than an 8 - can anyone tell me if I'm right or wrong - or explain it to me?

Edited to add: This rug was made from a free quilt pattern that I found on the internet. You can find it here http://www.ctpubblog.com/2010/03/17/bird-on-a-branch-table-runner/


Kinda hard to get a good picture of it because it's so long and skinny, so here are a couple of close ups so you can see details.


This is the first time I've used an 8-1/2 cut and I really enjoyed working with that size, but it seems SO much wider than an 8 cut! Now, I thought that the numbers used to describe the widths of the cuts were 1/32" increments, so a #8 cut was actually 8/32nds" or a 1/4", right? Well, I'm sure that an 8-1/2 cut is more than a 64th of an inch winder than an 8 - can anyone tell me if I'm right or wrong - or explain it to me?

Edited to add: This rug was made from a free quilt pattern that I found on the internet. You can find it here http://www.ctpubblog.com/2010/03/17/bird-on-a-branch-table-runner/

Wednesday, August 25, 2010
Cute Little Pillow
Yesterday I found an old Kindred Spirits book on clearance for 75% off that had lots of rug hooking projects in it. I have always liked their designs, so I bought it - and today I worked up one of the pillows that was in it. I've always wanted to hook through a wool backing instead of the normal monks cloth or linen, and that's what I did with this one. The hit & miss design of the star works well with my other hit & miss projects that are in the living room.


It was actually made in two pieces. For the pillow itself I used an old army blanket. The hooked section is actually like a sleeve, or a wrap and is open on both ends where the prairie points are - it is just pulled over the green pillow. I guess I could make different covers for it and change it out for the seasons if I wanted to!

I always enjoy finding ways to use up some of my worms and a chance to dip into my button jars and find just the right ones for the project.

Monday, August 23, 2010
Child's Bench
When Tonia & I went to the Denver Hook-in a few months ago, one of the vendors had a darling little bench seat for sale. It was vintage - with peeling paint and rickety joints. Tonia bought it and has fixed it up to perfection. She designed the beach/ocean themed rugs that she hooked to cover the seat and back sections. I wish I had a before picture of it so you could see how she vastly improved this piece of furniture. And I wish I was small enough to sit on it myself and dream about playing in the sand! LOL


Thursday, August 19, 2010
Have A Seat
I meet once a month for rug hooking at a quilt store in a small town. This town usually has flower baskets decorating the sidewalks on Main Street, but because of the poor economy and budget constraints they couldn't afford them this summer. Instead, a local gal offered the use of her vintage chair collection to dress up the downtown area. I thought they were very picturesque and added a lot to the ambiance of the shopping experience in front of the participating stores. Wouldn't you just love to sit for a minute and rest in some of these while walking down the street? Here are some pictures I snapped on Tuesday, in no particular order.


Tuesday, August 17, 2010
Gameboards
I have a small collection of gameboards that are displayed in the stairwell of my home. None of them are old, or valuable, but they make a nice graphic statement on the wall. I have made several of them myself using different mediums. Of course it's a really ackward place to get a good photo, but here's my best shot. Looking UP the stairs:

And looking DOWN the stairs:

And here are some close ups so you can see them better. I hooked this parchessi board years ago and it was a fun one. Love the colors I used - if I remember right, all the wools were as-is.

This little quilt is a backgammon board and I made it just last week. I drafted out the pattern and then pieced it on foundation papers. I had a hard time choosing fabrics and colors so that the design would show up properly. It's not perfect, but it'll do.

I won this checkerboard in an online giveaway a couple years ago - the gal who made it did a great job of distressing it to make it look aged.

The Chinese checkerboard came from the thrift store. I just added some color to it to give it more interest.

This punch needle checkerboard is the smallest item on the wall. I like the stars I added in the border.

This gameboard is one from the thrift store - I think it was once available from Tenderheart Treasures, and I'm not even sure what kind of gameboard it is!
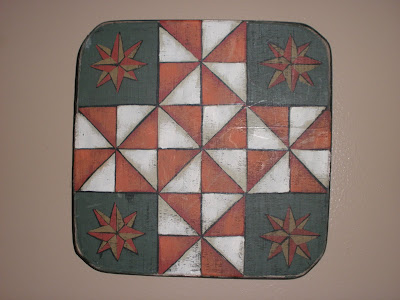
I made this checkerboard years and years ago - my kids actually played with it on occasion. The heart cutouts really make it look dated, but I still like it.


And looking DOWN the stairs:

And here are some close ups so you can see them better. I hooked this parchessi board years ago and it was a fun one. Love the colors I used - if I remember right, all the wools were as-is.

This little quilt is a backgammon board and I made it just last week. I drafted out the pattern and then pieced it on foundation papers. I had a hard time choosing fabrics and colors so that the design would show up properly. It's not perfect, but it'll do.

I won this checkerboard in an online giveaway a couple years ago - the gal who made it did a great job of distressing it to make it look aged.

The Chinese checkerboard came from the thrift store. I just added some color to it to give it more interest.

This punch needle checkerboard is the smallest item on the wall. I like the stars I added in the border.

This gameboard is one from the thrift store - I think it was once available from Tenderheart Treasures, and I'm not even sure what kind of gameboard it is!

I made this checkerboard years and years ago - my kids actually played with it on occasion. The heart cutouts really make it look dated, but I still like it.

Tuesday, August 10, 2010
New And Improved!
Early in the spring I found a chair at a thrift store for $4 that had good bones, was sturdy, and very comfortable to sit in. I purchased it and brought it home so I could revive it with a little paint and a little rug hooking. I finally got it finished and wanted to share it with you.


First I removed the existing seat and used liquid sandpaper to take the shine off the old finish so a new coat of paint would stick. I used spray paint, but after I was done I wished that I had used regular paint and a brush - oh well! Then I had to decide on a design for the new seat. I got my inspiration from reading Joanne's blog at Snippets and Scraps of My Mind who was making some really scrappy little rugs. I love that I got to use up a lot of my worms and yet make such a nice rug at the same time.

I had planned to put this up in my studio and use it when I hook my rugs, but I think it's going to stay in the living room to be used as extra seating when we have several people over to visit. The hooking makes for a nice padded seat and I think folks will like it! Here's a picture of what the chair looked like before I started the re-do.


First I removed the existing seat and used liquid sandpaper to take the shine off the old finish so a new coat of paint would stick. I used spray paint, but after I was done I wished that I had used regular paint and a brush - oh well! Then I had to decide on a design for the new seat. I got my inspiration from reading Joanne's blog at Snippets and Scraps of My Mind who was making some really scrappy little rugs. I love that I got to use up a lot of my worms and yet make such a nice rug at the same time.


I saw this cool old shoe rack at the antique store yesterday - sure wish I had room for it in my studio - it would look so nice loaded full of wool!

Subscribe to:
Posts (Atom)