I have been a quilting fool this month - making one small quilt after another - and not just flimsies - but actually quilting and binding them! They're all washed and crinkled now - YUM!
It all started with this one that was a Mystery Quilt from Temecula Quilt Store. I got it done quickly and realized how much I enjoyed the size and the instant gratification. 17" x 20"
I decided to follow along with Kathleen Tracy and made this one. I do have the book, but couldn't lay my hands on it, so just guessed about the size of the blocks - close enough for me! It measures about 19" square. For some reason this block gave me fits - I probably had to unpick at least six of the blocks which is very unusual for me. But I perservered and conquered the project!
Next was this little pinwheel quilt - I can't remember who shared on their blog recently about how to draw the template for this block, but six of them worked up really quickly - I'd actually like to make a larger quilt like this one some day! 12-1/2" x 16"
Cheri's quilt in Primitive Quilts & Projects magazine was next on the list. I love the combination of scrap piecing and wool applique. I discovered errors in the instructions, but made it work anyway. 17" x 23".
A version of this quilt is in one of my Jo Morton books, so I grabbed my basket of 1" strips and started sewing. Kinda wish I'd made the very center strip a bit longer so the proportions were more pleasing to the eye, but it'll do. 17" x 18". (Did you know that Jo has moved her blog?)
For this quilt I used my 1-1/2" scraps - I don't believe that any of the fabrics are duplicated on this one which makes it fun. Finished size is 18" x 21".
I followed along with Cheri on her blog when she shared instructions for making this small vintage reproduction quilt......
......but I decided it needed something more in the middle. Since it's close to Valentine's Day and the colors were so suggestive of that day - I cut out a red wool heart for the center. It's not actually attached to the quilt yet, but should take me just a few minutes to stitch it on. 15" x 17"
These go nicely with the small Grandmother's Flower Garden variation I made back in October when we went to Santa Fe. 16" x 20".
And even though I made these next two quilts several years ago, I don't think I've ever shared photos of them before. This one is 19" square - - - -
- - - - and this one is 12-1/2" x 14". Each star block measures about 1-3/4" square.
Last night as I was stitching the last of the bindings down, I had all the quilts spread out on the floor around me so I could admire them. Hubby didn't quite understand why we had quilted carpet, so he'll be glad to find them picked up when he gets home from work today.
As far as displaying these, I'd like to hang them en masse on one big wall - perhaps in the guest room eventually. That's actually the only room with enough in the house with enough empty wall space where they'd fit. If I ever get them up I'll share another photo then.
Hope you enjoyed my mini quilt show. I've had a blast working on them for the last two weeks and actually have a couple others started already. Not sure when I'll get back to my hooking!
For quite awhile now I've been meaning to give my blog a facelift, and last week I decided the time had come. But it hasn't all worked out like I planned - for some reason there are glitches in blogger that are giving me fits - is anyone else having these problems? DD#2 helped me load a new background that I really like when using Firefox or Internet Explorer browsers - but when I pull up my blog on my new iPad it just shows totally white - what's with that? Also, I tried to add a new picture for my header and I keep getting an error message saying that I am out of photo storage space and I need to buy more. Well, I have never paid for anything connected with my blog and I'm not about to start now, so I'm hoping if I'm patient the bugs will get worked out and I'll be able to make things look nice the way I want them to. I was able to add a tiny little header photo that looks totally ridiculous - but that's what I'm going with for awhile. DD#1 added a 'Follow Me on Pinterest" button so people can visit my boards there. So anyway, that's what's up with the changes.
And just so there's a little eye candy with this post, here's a photo of a new rug that Nancy is working on - a Margaret Shaw design with big fun borders that I took a couple of weeks ago.
(If I'm supposedly out of storage space, then why can I post this picture? Grrrrr)
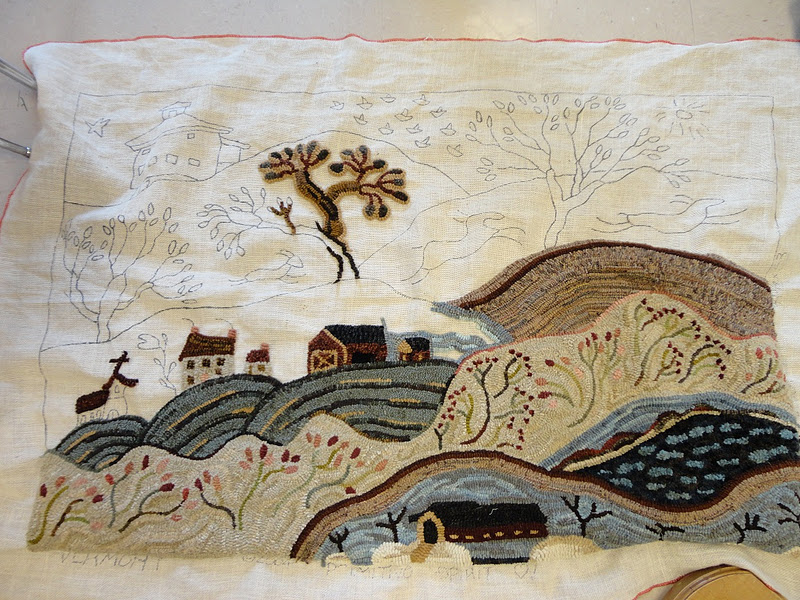
Lauren tells me that I forgot to show a picture of the rug I'm working on in my last post, so I thought I'd share it here. It's a scrappy rug - I'm using lots of leftover worms - and it's kinda mindless so it's easy to hook. Nothing spectacular - but it'll look good on my dining room table with a big wooden bowl full of 'goodies' displayed right in the middle of it.
Last week our rug hooking group met at my house and we had a nice turnout because the weather cooperated - there has been no snow so far this winter to hinder travel. Without further ado, I'll share photos of the rug projects that everyone was working on that day.
Jeanette brought her finished Americana rug.The antique black background has great movement in it!
I love the finished edge on this one - she used a ticking stripe to make a facing for the prairie points. She said the instructions in the book were no help at all in explaining how to do this, but she finally figured it out all on her own.
Here's a picture so you can see close up the way it looks on the back.
Sharon is working on a new rug for the floor at her front door that has quilt blocks on it. The plaid wools she is using look really cool when they're hooked up - and I like the way she's hooking nearly the entire rug using straight lines. She says that it does get kinda boring, so she'll probably start another rug soon so she can switch back and forth between them.
Sandy brought a quilt for show & tell - the very first one that she's ever made! It was a mystery quilt with kits put together by her LQS and we all ooh'd & aah'd over it.
Angela is working on a rug of her own design - I love the beading she's done on it.
Kim drew some cute mittens hanging on a line and is hooking them with some fun bright colors and a black background.
And Tonia is making headway on this huge rug designed by Karen Kahle.
On Saturday our Rug Hooking Guild had our quarterly meeting where we were each provided with an inexpensive plastic photo album. Then we were turned loose with scrapbooking paper and rubber stamps and ink pads to design a cover for it. The idea is to use these photo albums to store pictures of the rugs that we hook so we'll have a record of them. Since some rugs are given away as gifts, it's nice to remember exactly what it looked like. You can also include information about when it was hooked, who designed it, what kind of backing was used, etc......
Here's a picture of my album, and you can see the rest that were made on the Guild's blog.
I've been stitching along with lots of other quilters in blogland lately, and just finished up the last block of Temecula Quilt'sTwelve Days of Christmas project. (it took me quite awhile to realize that the 4th day had 4 pieces, and the 6th day had 6 pieces - DUH!)
I'm looking forward to see their suggestion for a setting. It's been quick, fun and easy! And I love seeing all the different fabric choices that have been made!
A couple months ago I found a nice round oak frame at the thrift store for a ridiculously low price and couldn't pass it up. I decided to make a single Dresden Plate quilt block to go in the frame and set it on a shelf in my family room. The frame measures about 8" across so I made my own template by folding a circle that size into smaller and smaller wedges - then I added seam allowances and started cutting and sewing. After a rejected first attempt, I'm real pleased with the way it turned out!
The shelf could still use some tweaking on the right side - I'm working on it.
The first one I made was rejected - something went wrong and it was turning out way too big and had a gazillion pieces.....