Tuesday, October 15, 2013

Wooly Goodness

I had lots of fun wooly experiences last week - to start with I attended my monthly meeting with the Salt Lake rug group - our numbers were few, but there was good show & tell. Nancy is nearing completion on this geometric rug she found in a book by Pat Cross. She switched up the colors from the original to make it her own and it's lovely. 

Nancy recently took a trip to Europe to celebrate her 50th wedding anniversary, and she found this gorgeous wool & silk jacket at a small shop in Paris (I think). It's light as a feather - made with a foundation of wool roving, and then silk fabric was needle felted into the design - I'm sure it will be extremely warm to wear without any bulk at all - so pretty! She said it was interesting trying to converse with the artist through the language barrier LOL!


Myra was working on a Maggie B design with three little chicks. The background is much different than Maggie's version - I like it better I think!


A year or two ago I stumbled upon this wonderful blog and realized that the author lived only about an hour away from me. I loved seeing all the projects she shared in her posts, and on Friday I finally made it to her Open House and got to meet her in person! Leisa has a gorgeous shop above the garage of her house and it is full of her hand dyed wool and tons of beautiful stitched projects. Twice a year she has an Open House and invites anyone interested to attend. It was so fun to mill around looking at all the eye candy. The place was packed! Here are a few photos I took of the event. 

This is the entrance to her studio - through the door and up the stairs to heaven!


Some displays around the big open room.


Hand dyed wool for sale.


A trunk show from Wooly Lady & Heart to Hand


I could hardly go to sleep when I got home that night because of all the eye candy and visual stimulation I had received during my short visit. Thanks so much Leisa!


Monday, October 7, 2013

Bleach Painting & Quilt Projects

Way back in high school I remember having a favorite pair of jeans that I embellished with a gazillion decorative stitches in lots of colors using embroidery floss - I think I wore them to death in the 70's - kinda wish I still had them! (not that they'd still fit, of course)  Anyway, this project I did over the weekend makes me think of those just a little bit because I think it's only the second time I've ever fancied up my jeans. Using a Clorox bleach pen I altered the look of this pair of denim pants.


To start with I cut some cardboard to insert inside each leg so the bleach wouldn't bleed through to the other side of the pants.

Then I used the fine end of the bleach pen to draw a design on the denim.  If you look closely you can see the faint chalk line I drew as a guide before applying the bleach.

Repeated for the other side. I found that the heavier the line of bleach, the whiter the denim turned. And you have to be patient and let the bleach sit on the fabric for a good 30 minutes or more. I rinsed the pants in the kitchen sink with my sprayer - then immediately threw them in the washing machine.

A friend has a similar pair of jeans with a Ralph Lauren label on them and I really liked the paisley type of design on hers so I went in the same direction although you could do anything under the sun using this same technique. FUN!

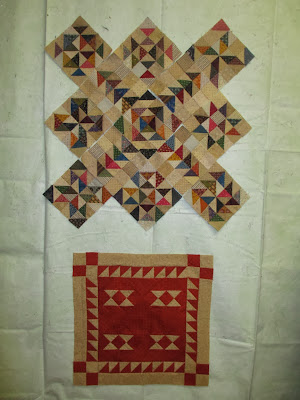
These two small quilt projects are not quite finished, but they need to come down off of my design wall - - - -

- - - so I can get started on the wedding quilt using these polka dot fabrics. The pattern for the quilt changed over the weekend so we're going in a whole different direction now - it will be fun. 


Thursday, October 3, 2013

Pickles Quilt Show

I attended the annual neighborhood quilt show put on by the ladies of the Pickles Quilts group - an event I look forward to every summer. Here are a couple pictures, but for even more please go visit my friend Clydene's blog where she shared every quilt that was displayed. This group of ladies choose a quilt pattern, then they each make it using their own colors & fabrics - so fun to see how they're the same & different. Joy's beautiful yard is the perfect setting for this fun day.


I think the pattern below - called Swoon - is what I'll be using to make the wedding quilt for my son and his sweetheart. With nine giant 24" blocks it seems very doable to me.


Wednesday, October 2, 2013

Puzzle Ball

I finished sewing the puzzle ball together yesterday. Maggie B seemed to think these were sewing related, but I've always thought they were baby toys - does anyone out there know for sure? Anyway, I'm glad to have it done and move on to the next project.


Monday, September 23, 2013

Maggie B.

Last weekend was our Guild's 3-day workshop with Maggie Bonanomi. It was a lot of fun to spend so much quality time with my rug hooking friends. Each of the attendees received kits to make the velveteen strawberries and puzzle balls that are included in one of Maggie's books. I got the strawberry stitched up this weekend - I added beads instead of using dyed pins like she suggested.


And I'm well on my way to finishing the puzzle ball - just need to get the fancy stitching done along each of  the seam lines and attach each section to each other. 

Maggie suggests using cotton stuffing for these small projects - I believe she uses the kind of cotton balls for removing makeup - but I went to my local upholstery shop and bought a bunch of cotton for $2 - I think it's used to pad arms on chairs and couches - and it worked perfectly for these. I stuffed it in there really tightly and it gives a nice heft to the project. 

This is the small heart mat I made when she taught us her Wonky Technique. I had never realized it before, but she never uses a wool cutter for her strips. Instead, she tears a piece of fabric that's between 3/4" & 1" wide - then she uses scissors to cut that strip up the middle. It ends up imperfect and wide - gives a really nice effect.

And here is the main project I worked on for the class - made a little bit of progress on it and hope to get it done kinda quickly - using that wide cut helps it move right along.  

The highlight of the workshop came on the last day when we got to see the projects from her new book in person. If you'd like to see them you can click on this link to view the Guild's blog - there are lots of photos there.

This photo below shows my favorite item from her new book - she showed us how she cuts her letters freehand for her applique projects so I think I might like to try and make one similar to this using a bit more color. Fun weekend!

Saturday, September 21, 2013

Exciting Times!

It's been a very eventful week at my house. Today was my daughter's baby shower - and she definitely got showed with gifts from family & friends. Her baby boy is due to arrive in about eight weeks and we can hardly wait. One of my contributions was the baby quilt I made for her and I can finally show it to you now that she's received it.  A simple design of nothing but half square triangles set every which way - no rhyme or reason to the arrangement. I used 10 different Kona solids and a stripe for the back and binding that tied them all together.


And on Monday my son proposed to his sweetheart - in her classroom - with the help of her students (and the principal & office staff) Our whole family was there for the occasion and it was really special. The wedding will be held in December during winter break from his college classes.
Life is GOOD!

Thursday, September 12, 2013

One Thing Leads to Another

I have finished appliqueing the colored wool leaves onto my Kim Diehl quilt - now it's layered and pin basted and waiting to be machine quilted. 


I had a few of the wool leaves leftover and started playing with them - found out that they make a nice design all by themselves. So I cut out a few more and started stitching them down onto another piece of wool - this will make a small table topper eventally.


Just finished this book about four sisters of a certain age - enjoyed it!