Thursday, January 21, 2016

English Paper Piecing

Just about a year ago, the Temecula Quilt Co started a sewalong on their blog for making fussy cut six pointed stars using English Paper Piecing. You can find their tutorial HERE. I jumped on the band wagon and have enjoyed every minute of it, although I'm much slower than they are. It's been fun to look at pieces of fabric in a different way to see if it will work for this technique. So far, I have made about 100 of these stars - my stack is pictured below.


After awhile, I started thinking about how I was going to sew these all together, and that's when my problems began. I tried the version below for twenty or so blocks and then began wondering if I really liked them this way - maybe too busy?

And so I've looked at a couple other versions. For this one I would applique the stars to a background square and then sew them all together with sashing between the blocks. I think this would make the largest quilt.

The one shown below would have the stars connected with large hexies. It would require purchasing a lot more of the pre-cut paper pieces and sheesh that's getting expensive! I'm not loving the background fabric - I think it needs to be a little lighter - ivory maybe?  Anyway, I wonder if you all could help me out by discussing which one you like better - or perhaps suggest another version that I haven't shared here.

Anyway, my Dad's wife has a birthday tomorrow. I started this project for her LAST year and it got derailed by something-or-another, but it's finished now and has already arrived at their house in California. I fussy cut the floral fabric in the center and added hexie borders around that. I had intended for it to be a table runner, but the more I thought about it I decided it could also be used over the back of her wing back chair, or under the TV, or on her dresser. It will be interesting to see where she likes it best.

And looky here Kyle - your good influence has rubbed off on me so I made a fun little label for the back!

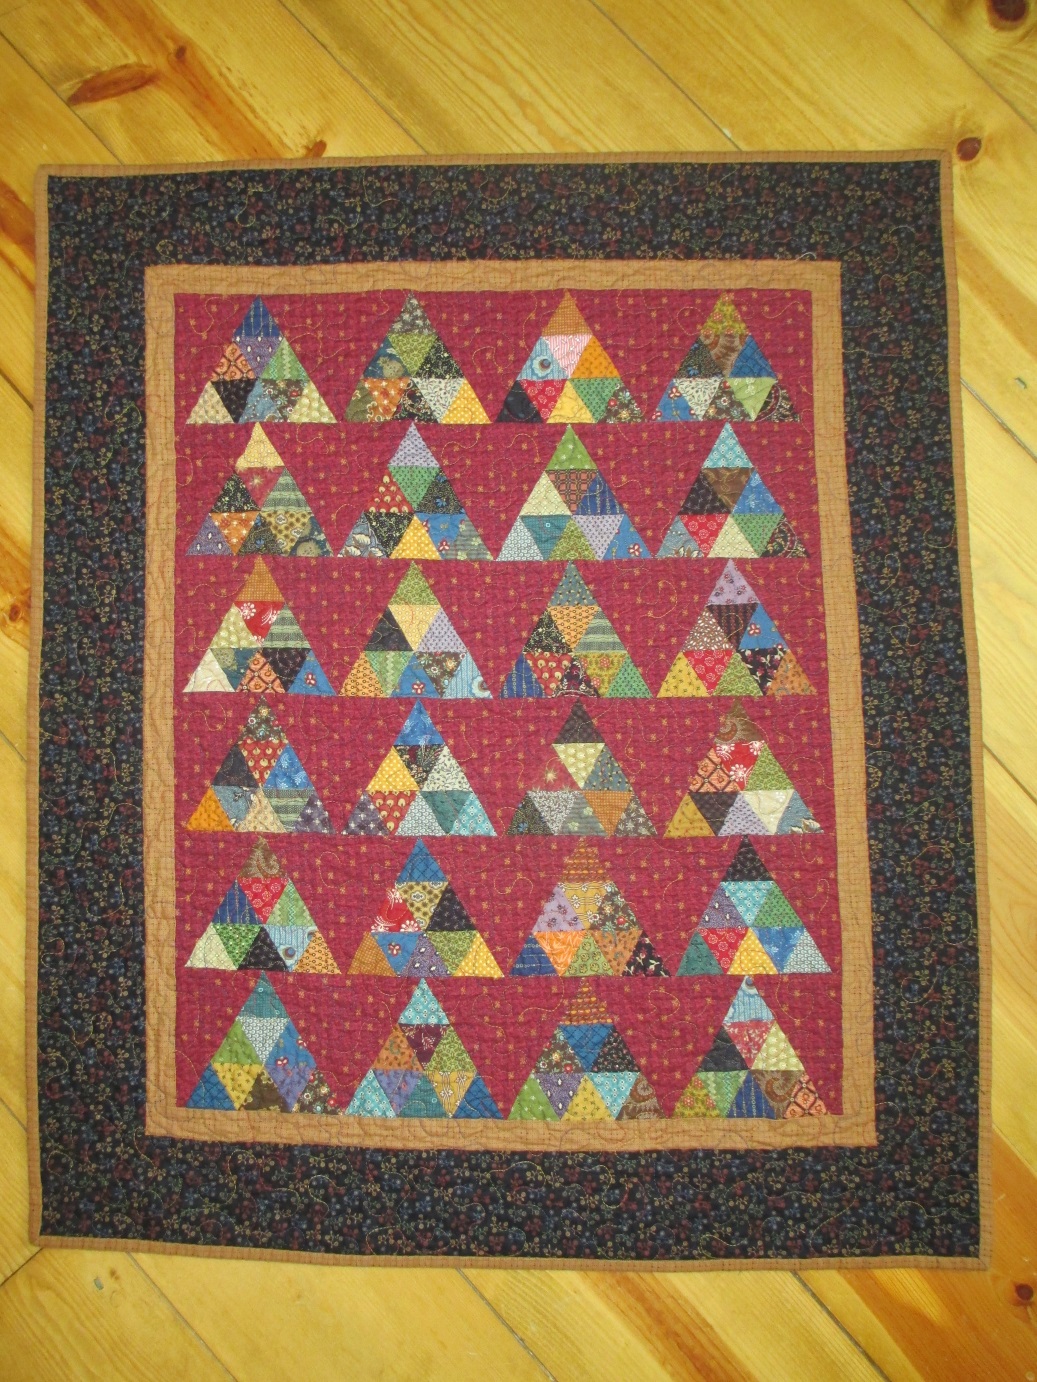
Last week I met with the Salt Lake Rug Group and everyone had projects in the last phase of completion to show. Yvonne machine quilted the triangle blocks on this beautiful quilt, and was hand quilting diagonal lines in the border - such a great design with the wool applique.

Nancy was whipping the edge of her rug with yarn.

And Myra showed us her finished floral that just needed a good pressing and edge finish.


Saturday, January 9, 2016

Keeping Busy

I stitched up a small quilt top this week - it isn't quilted yet, but hopefully that will happen soon.  It's a Kim Diehl design from her book Homestyle Quilts. The one in the book measures 60" square, but I shrunk mine down to finish at 26" square - the blocks measure 3-3/8". It's name is Crossing Paths.


I love all of Kim's designs and this one caught my eye because it's in the same book as the design I'm turning in to a hooked rug - my progress on that project is below. It's supposed to have a patchwork border, but I switched it up and added some scallops and circles that kinda makes me think of eyelet lace. Kim named this design Blackbirds & Berries. I'm not loving the brown basket at the bottom of the rug - think I'll have to find another piece of wool to replace it with.


My studio has a wood floor, and I am constantly chasing my sewing machine foot control all over the place under my cabinet when I sew. I saw this tutorial to make a non-slip pad to put under the controller, so thought I'd make one up to see if it will actually work for me. Crossing my fingers! You can find the same great tutorial HERE - she actually has a ton of really good projects and information on her blog - I need to go back and take a thorough look around and I urge you to do the same!


Today's the day I promised to draw the winner of my Valentine mug rug giveaway. So, without further ado, the name that came out of the hat is Lori who blogs at Humble Quilts. Congratulations Lori! I am very happy to send it to her since she is a generous blogger who leads free SALs on a regular basis that are a lot of fun to make. Hope you enjoy this little gift Lori! Thanks to all of my readers who make blogging a wonderful experience!

Sunday, January 3, 2016

I'll Start With The Thread...

Last month I stopped at the thrift store and found a large bag of thread cones for only $5 - so I snatched it up quick. Most were still in their wrappers. Only problem is - now I'm not sure what it's designed for. Machine quilting? Machine piecing?


There isn't a label telling me what the fiber content is and I'm not familiar with the logo. Does anyone know anything about it?

I even tried scanning the bar code with my smart phone but came up with 'no results found'.

I started a new rug hooking project last week and I'm loving the way it's turning out. I just figured out what kind of border I want to put on it and got that drawn on the linen today. I've been pacing myself so that I won't finish it before going to my next couple of rug group meetings. It's a quilt pattern from Kim Diehl that I found in one of my books - I love that quilting and rug hooking are so compatible and interchangeable!

My two sweet daughters were SO good to me at Christmas - and gave me gifts that I absolutely LOVE! I've been seeing lots of coloring books for grown ups at the craft stores and online, but have never found one that really appeals to me. DD#1 found this one and it is so perfect - full of wonderful primitive folk art designs. Only problem is, I'm not sure I can bring myself to actually color them since several of them are perfect for rug hooking and quilt applique. So fun!

DD#2 found this table lamp with a clear glass base. I filled it with vintage wooden thread spools from my collection and it looks great sitting on a table made from a treadle machine base in my living room. I added one of my toy sewing machines, a small quilt, and other goodies for a display. Cute, huh?

Remember last month I made Christmas stockings for my son & his family? Well, for one of them I used a specialty ruler for cutting equilateral triangles and I had a lot of fun with it. So I decided to make myself a small quilt  using the same ruler. It's been pieced for quite awhile now and I finally got it quilted and bound yesterday afternoon. Pulled it out of the dryer just a few minutes ago and it's ready to use in my decorating. It measures about 18" x 34".

I used a variegated thread and did allover meandering - the type of machine quilting that I'm most comfortable with. I really need to branch out a bit and try something different one of these days. (sigh)

I had so much fun with the mug rug swap that my rug group did for Christmas, (see photos a couple posts back) that I made another one to coordinate with a mug I found at the thrift store. I'd like to give it away to one of my wonderful readers & friends. It's got a Valentine Day heart theme going on so it's perfect for this time of year. The rug measures about 5-1/2" square and in addition to using strips of wool fabric, I also used some wool yarn because I happened to have the right color (pink). Hope you like it! I'll take comments until Saturday, January 9th, and then draw the winning name from all the entries and pop it in the mail. Good luck! And thanks for making blogging such a fun experience for me each time I publish a post! I love sharing with you!
                                                      (GIVEAWAY NOW CLOSED)